If you have an older, legacy television, can you still stream your iPad or iPhone to your TV, watching movies on a larger screen? An earlier post showed
streaming is possible using the Apple Composite AV Cable; however, my testing also showed this experience was a far cry from video mirroring (where your TV display mirrors what's on your iPad).
So is iOS video mirroring on your old TV doable at all?
I'm pleased to say
video mirroring is possible on that old TV in many cases. Using a different combination of cables you can mirror your iPad, iPhone or iPod Touch on your legacy TV, as this post will show.
What will video mirroring buy you? After all, the Composite AV Cable solution is simpler, requiring only one cable. However, the streaming only displays on your TV if it is supported by the video app you are using, and support is sporadic. And anything that is not "streamed" definitely cannot show on the TV using the Composite Cable: games, the Internet, regular apps, etc. Video mirroring should allow everything to display on the TV, just as you see it on your iPad or iPhone.
However, this video mirroring solution requires a combination of cables, and so may test the patience of some. It's not difficult, but it's also not an easy, simple solution.
Older TV Video Mirroring - What You Need
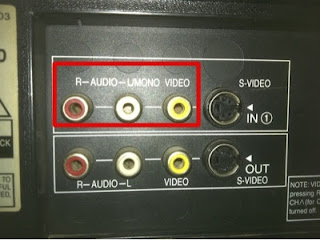 |
| TV with RCA connections |
Here's the environment I tested with: I have an iPad 3 with a 30-pin connector. My television is a Sony Trinitron with RCA composite connections.
The two most important variables here are your iOS connection (30- pin or Lightning) and your video-in TV connection, which can vary the cables you need.
Video mirroring components:
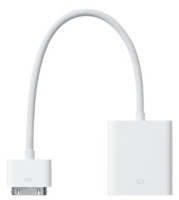 |
| Apple Dock Connector to VGA |
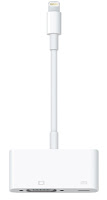 |
| Apple Lightning to VGA |
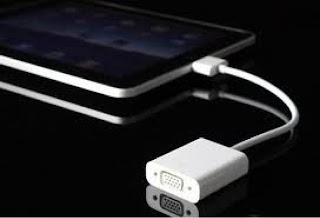
1.
Apple Dock Connector to VGA or Apple Lightning to VGA
This cable will convert your iPad's video signal into VGA, which is a more common industry video standard, supported by a variety of cables. Use the cable that matches your iOS device.
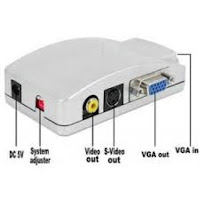 |
| Sample VGA to RCA converter |
2a.
Video: VGA to RCA converter (varies based on your TV video-in connection)
This device takes your newly-converted VGA video signal, converting it to a format compatible with your TV. If your TV has a RCA video-in connection (see picture above) this is what you will use. If your television is a little newer, and has the Red Green Blue (RGB) video-in connection, you may just need #2b.
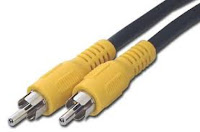 |
| RCA video cable |
2b.
Video cable to your TV
Connect a yellow
RCA video cable to #2a, and the other end to your TV's yellow video-in connection. Relatively newer televisions, with RGB video connections may be able to use a
VGA to Component RGB cable only, but you would have to test this.
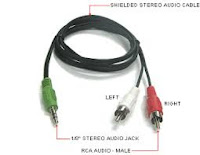 |
| RCA audio cable |
3.
Audio cable
#2 above handles video; you also need to account for your sound. A simple choice is to listen from your iPad. But a better option is to use a
RCA audio cable (red/white cables) that connects to your iOS device. You'll want a Stereo 3.5mm to stereo RCA Y cable connector cable. If you connect this cable from your iPad to your TV audio-in this will play your sound through the TV speakers. If you have a receiver, connect the cable to the audio-in of your receiver and your iPad's audio will sound great through your big speakers!
Testing Results
All in all, video mirroring worked quite well! I connected everything, powered on my iPad, and my start screen displayed immediately on the TV. The Internet with Safari, Games, and virtually all apps, including those streaming apps that did not work with the Composite AV Cable, display on the legacy TV. From this standpoint, it's a very satisfying solution.
Limitations
What doesn't work? Amazon Instant Video, just as it does with the Component AV cable, does not display on the TV - the Amazon app blocks the signal. Also (and ironically), movies purchased through iTunes will not display on your TV either; the Apple app apparently does this to prevent piracy. iTunes movies are the one item that works okay using the Composite AV Cable, but not with the video mirroring setup. Finally, the Netflix app streams fine to the TV, but doesn't video mirror on your iOS device.
It's important to note that video output through an RCA connection is limited to 800x600 resolution. I have watched hours and hours of video streaming in this manner, and for most uses this resolution is acceptable; still,you may be dissatisfied with the video quality. Certainly it's no match for the iPad's retina display.
Summary
I find the trade-off of a larger screen, big speaker sound, and an environment where the whole family can easily watch a video worth the sacrifice of the reduced resolution. Of course, a new HDTV would nicely solve the resolution problem! But if you have an older TV for now, this solution will let you video mirror with your iPad, iPhone or iPod touch.
Finally, for those willing to invest a little more, it is possible to use
Apple TV with older, non-HDMI TVs.
Note: product links are examples only and not recommendations.


