For those new to e-mailing with the iPad, this e-mail tutorial will get you started creating new e-mails, replying to e-mails, and forwarding e-mails you receive to new people. iPhone and iPod Touch users: this tutorial will work for you also.
1. Creating New E-Mails
We'll start by creating a new e-mail from scratch. We will choose who our e-mail will go to, type in a subject title, compose the e-mail and send it.Start by opening the Mail app, and choosing any e-mail to view, as below. The e-mail itself is irrelevant, all we are going to use is the "new message" icon.
1.1 In the upper right-hand corner, notice the "New Message" icon (I have highlighted with a red rectangle). Tap the New Message icon to get the "New Message" window.
1.2 You should see the New Message screen shown. The cursor will be flashing in the "To:". The first step: type the contact name(s) or the e-mail address(es) you will send this e-mail to.
1.3 Start typing the name of the first contact to get this email. If you have
setup your friends and family in the Contacts app, sending emails is easier, because you can pick their names from a list of matching contacts as you start to type. Otherwise you have to remember and type in their actual email address here.
1.5 Unfortunately, I haven't set up Jack as a contact. So I type in his e-mail address here.
1.6 Next step: add a Subject to my e-mail. Tap the Subject box; the blue cursor wil flash on/off there, and the keyboard will pop up. Type in your subject.
1.7 A descriptive subject title will help my friends know what this e-mail is about as they scan their inbox. ("Hello All!" probably is a subject that could be improved upon!)
1.8 Now to create the text of the message. Tap in the main body of the e-mail, just below the Subject box. Again, the cursor will blink and the keyboard will pop up. Type your message (see our message highlighted in red). To send your message, tap the blue Send button in the upper right-hand corner.
Summary: Creating New E-Mails
- Type who the e-mail will be sent to in the To: field.
- Title of the e-mail in the Subject: field.
- Type your message in the body of the e-mail
- Tap the blue Send button and your e-mail will be instantly sent to your addressees
2. Forwarding an E-Mail
For those new to e-mail, "forwarding" can be confusing at first. Simply put, this will take an e-mail you have received and "forward" that e-mail to someone else. For example, Sally sent you an e-mail with some cute pictures of her new baby, and you want to forward that e-mail/pictures to Julie.
Let's look at a couple of examples to illustrate forwarding e-mails. First, we've received an email telling us of a good sale. We want to forward this on to let another friend know.
2.1 To start, while viewing the e-mail you want to forward tap on the left-facing arrow icon (as highlighted above) and choose "Forward".
2.2 As with the new mail, in the To: space (highlighted), indicate who should get this e-mail. Also, notice the subject defaults to the same subject as the original e-mail had. To indicate you are forwarding this e-mail, a "Fwd:" is prefixed to the Subject (highlighted above).
2.3 Type your message in the email body. Tap the "Send" button to send it. Your recipient's email will contain your message and, below it, the original email that you "forwarded".
2.4 Forward E-Mails Example #2: We are forwarding to David an e-mail received about the event on the 27th. Highlighted in red are the additions we made (who I'm sending the e-mail to, and the message text).
2.5 This is the forwarded e-mail David received. At the top is our message, and immediately below (indented with a vertical blue line to the left) is the original e-mail we received and sent on.
3. Replying to an E-mail
You have received an e-mail, and you want to send an e-mail reply back to the sender. This is perhaps the easiest e-mail scenario.
3.1 To reply to an e-mail, while viewing the e-mail you want to reply to,
click on the left-facing arrow icon (as highlighted above) and choose "Reply." In our example, David wants to reply back to the sender and thank him for forwarding the note about the party on the 27th.
3.2
For a Reply, much info is automatically prefilled. You are replying back to the sender, so their address is filled in for you. Likewise, the Subject is from the original, and prefixed with "Re:" to indicate a "Reply.".
We have simply added a short message (highlighted in red). To send it we tap on "Send".
3.3 Here is how the Reply looked that Jack received. The Reply E-Mail we composed is highlighted in red. The original note we received and are replying about is immediately below (indented with a vertical blue line to the left).
This post has covered sending new emails, forwarding on emails and replying to emails. For those new to email using their iPad, iPhone or iPod Touch, hope this has helped!
 After a while, it's not unusual for your iPad to start running out of space. Apps, especially those designed for the retina screen, can take a surprising amount of space. Periodically it makes sense to go through and remove those apps that you no longer use.

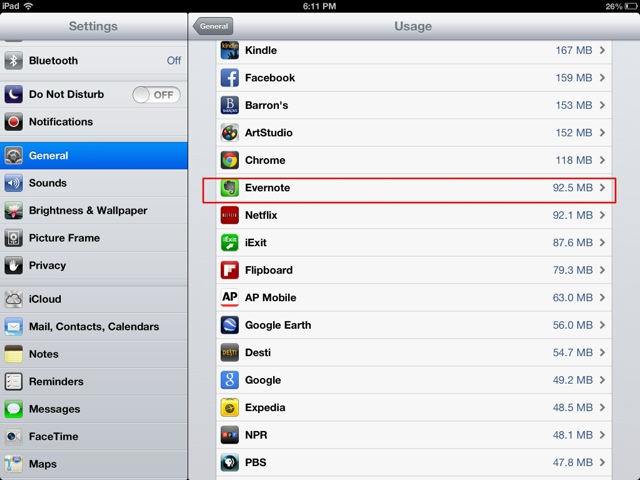 4. The list of apps continues in descending order by space used. I don't use Evernote as much since I discovered how to create folders in the Notes app. Since it's taking up 92.5 MB, I'm going to delete it, so I tap on its name in the list.


